28 May Your Complete Guide to Food Photography
A perfect picture comes with the photographer’s decision; he is responsible for capturing a photograph which tells its story.
Every photograph tells its own story, whether it is a business success party, birthday party, or a recipe of roasted beef in your home. Therefore, you must be mentally prepared that you are going to tell a story through your photographs.
Not every shoot you may do in your photography career is easy, sometimes you face different challenges to tell the story.
“Local businesses have a median of 11 photos on Google My Business”
Therefore, here are some quick tips, which will do wonders to help you improve your food photography.
- Hot Dishes Shoot:
Hot dishes shoots are usually the one in which you have a small amount of time to get the perfect shot because the food looks in its best shape when smoke comes out.
However, you don’t need to take the sudden shots when food comes up. You can prepare a rough draft as most professional photographers do before shooting a real picture. A rough draft is a kind of rehearsal in which you check the lights and camera, and take some shots with the dummy food before the real one. This rehearsal helps to prepare you for the actual moment when the HERO FOOD comes, and let you take some fantastic shots of the food!
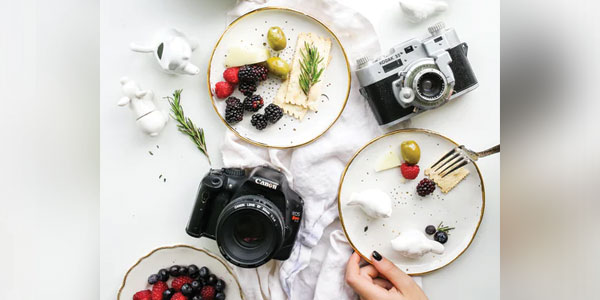
- Props:

Props are a way to take your picture from amateur to professional. A food picture alone on the table doesn’t look attractive from the audience perspective. Therefore, it is crucial to use props if you want to get some professional shots.
Following are some props which think every food photographer must have while doing their food photography shoot.
- Rustic, fun cutting boards:
A rustic board helps to add detail and attraction to the photo. Also, white pots or white backdrops help to put contrast in the food shot.
- Unique knives, Vintage, chopsticks, and ramekins:
These helps in the visualisation of the viewers- to see the dish and making themselves feel as though they are eating or preparing to dig into the meal. In this way, it helps to convey a story.
- Backgrounds:
Choose your colours wisely, because it reflects in the eyes to grab the attention. Choose colours like woody (rustic), white, grey, or some dark colours.
If you are going to post photographs on Instagram, then you must have to consider what attracts your audience a whole because people eat with their eyes first. Therefore, you must make your background balanced with pleasing colours to upload an appealing feed on your Instagram.
- Imperfect, Rustic, or grey ceramic bowls:
These things are something which you should not exclude from your image. It builds a uniformity in your food photography. Also, make sure to buy some matte dishes, finished and worn because if you buy some shiny dishes then it will distract the level of your photography from capturing the effectiveness and texture of your food.

- Anything with texture:
You can add emotions in your photograph by using textiles with attractive colours combination. Try using some inconsistent clothes which develop a sense of being at a picnic. Also, use some already-used towels, so your audience understand that you cooked food with your hands.
- Plants and flowers:

Nature attracts the viewers; therefore, try to use some beautiful plants and flowers in your pictures. It will also make you feel good with its scent when you will take pictures.
- Use Glasses:
Using different kinds of beautiful glasses and bottles can help to persuade a sense of clarity towards your audience. Try to use different sizes of bottles, wine glasses of light tinted colour, mixtures, and clear glasses. It will give shape and character to your picture by making people believing it.
Types of light
Indirect light:
Indirect light is like shooting in a sunny location, but the light of the sun does not directly reflect on the object you want to shoot. This indirect light usually appears at the peak hours of the day, when clouds cover a sun but its light still reflect. If you take pictures at this time, then you may end up by taking some of the best shots of your life.

Harsh direct light:
This one is my favourite, but it is not an easy one because perfect light is hard to find. For this method, you will have to use some shadows, colours, and glare light; it will help to shape a story of your picture.
Sidelight:
When the light comes from the front, back, or the side of your set, then it is called slide light. Shooting at this light is more fun, but it is preferred that you only shoot on this light when you get proficient and comfortable with your lighting, camera and, props.
Use Green:
Green colour reflects refreshment; therefore, try to use some green ingredients in your food pictures like salad, lettuce, or veggies.
These things always stay in my fridge in a wet napkin, and when I have a shoot, I take them out, wash them, so it left some drops of water to make a good shot of picture.
Plan Your Story:
Before a shoot, you must plan what you want to portray with your picture because it gives you a clear direction of what story you are going to tell.
Focus on one thing:
My best tip for you is that put your entire focus on one thing. For example, when I start my shoot, I just focus on lightings or arrangement. Sometimes I just try to get to know my camera better, so I just start playing with Aperture, shutter speed, white balance or iso. Try to set your goals for every shoot you do and see what makes you comfortable for that particular shoot.
You might be thinking that what difference will this tip make! So, I can just tell you that apply this tip, and you will see a balance change in yourself to work better.
Bonus Tip! Don’t Shoot when Hungry!

You must fill your stomach before going to the shoot because food photographers have to spend up to two hours in a single shoot until they get their desired shots. So, if you will have an empty stomach at your shoot, then you will end up at eating food which needed to shoot.